
Quick Start for Belt Tensioner
This section explains how to get started with SIMRIG SBM and SIMRIG Control Center. Have a look at the software manual for a deeper explanation of the various features.
Go ahead and install SIMRIG Control Center. See the Installation section for details.
Connect your SIMRIG SBM to your PC and make sure it is powered.
Start SIMRIG Control Center.

SIMRIG Control Center when first started.
We have a single device connected to our system. This is apparent by the status message at the bottom of the screen: “Connected to 1 device”. If this message reads “Searching for devices” then make sure the belt tensioner is connected to your PC and powered.
Calibration
The belt tensioner requires calibration on first use. Navigate to the Devices tab, select the SIMRIG SBM, and press Auto Calibration.
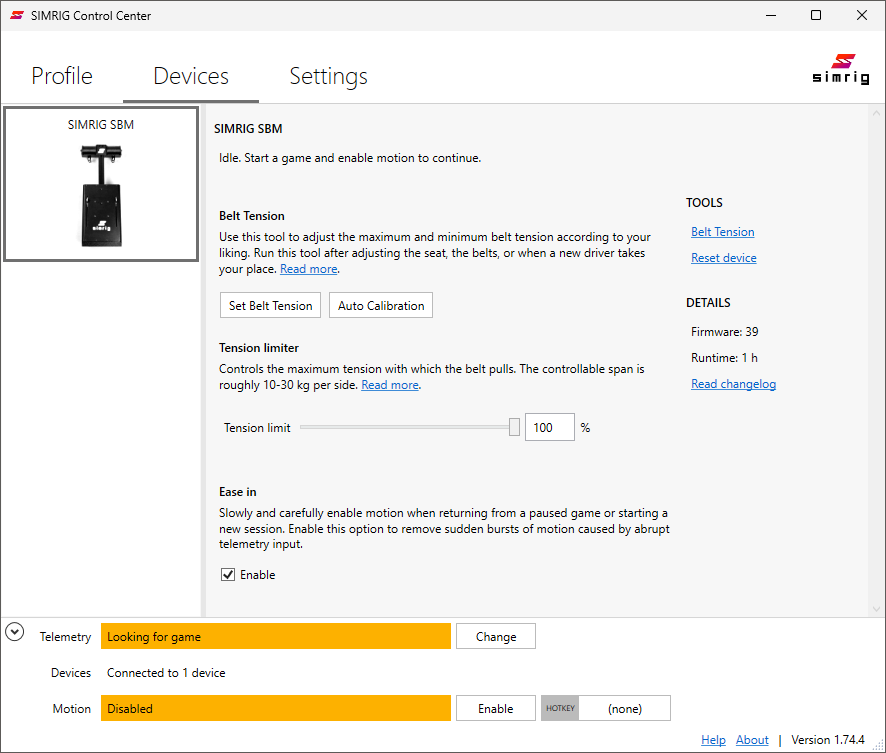
The SIMRIG SBM on the Devices tab.
Get seated and buckle up. The harness should be loose enough for a fist to fit between the harness and your body. Lean back into the seat as when driving. Then press Calibrate Now.
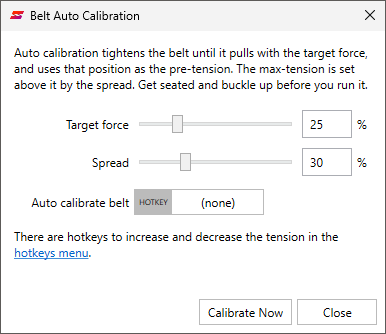
The Belt Auto Calibration dialog.
The shoulder straps tighten until they pull with the target force, and then loosen again. The calibration is done. Do not tighten the harness by hand after this.
- Target force:
The force the shoulder straps tighten to while calibrating, in percent of the strongest pull of the belt tensioner. The harness should end up tight, but comfortably so.
- Spread:
The distance from pre-tension to max-tension, in percent of the full travel. A larger spread gives stronger effects.
We recommend that you try different values to see what you like. Reduce Spread if the belts pull too much.
Bind the Auto calibrate belt hotkey to run the calibration without leaving the seat. See Auto Calibration for more, or use Set Belt Tension to set the tension by hand instead.
First race
Motion is disabled at startup. You must manually enable motion by pressing the Enable button. We recommend binding a hotkey for this too.
No telemetry is currently available as indicated by the “Looking for game” message. This message goes away when you launch a supported game; or manually select a console game.
Console (XBOX / PlayStation)
Console users should head over to the console specific getting started guide.
Car and game selection
The software comes pre-configured with a selection of vehicles. It is recommended to try one of these the first time.
Game |
Vehicle |
|---|---|
Assetto Corsa |
Ferrari 488 GT3 |
Assetto Corsa |
Nissan GT-R GT3 |
Assetto Corsa Competizione |
BMW M4 GT3 |
Automobilista 2 |
BMW M4 GT3 |
DiRT Rally 2.0 |
Any car |
EA SPORTS WRC |
Any car |
F1 24 |
Mercedes |
iRacing |
Mazda MX-5 Cup |
iRacing |
Porsche 911 GT3 Cup (992) |
Le Mans Ultimate |
Ferrari 499P |
Microsoft Flight Simulator 2024 |
Cessna 172 Skyhawk (G1000) |
RaceRoom Racing Experience |
Ferrari 296 GT3 |
RaceRoom Racing Experience |
Volvo 240 Turbo |
rFactor 2 |
Aston Martin Vantage GT3 |
rFactor 2 |
Bentley Continental GT3 |
rFactor 2 |
Ferrari 488 GTE |
rFactor 2 |
McLaren 650S GT3 |
rFactor 2 |
Mercedes-AMG GT3 |
Richard Burns Rally (NGP) |
Subaru Impreza GC8 |
Richard Burns Rally (NGP) |
Volvo 240 Turbo |
Other vehicles work too. A profile is created automatically the first time you drive a vehicle, and Auto-Tune adapts it to the vehicle while you drive. Expect the motion to improve during the first few minutes. Read more about profiles.
Some games do not work out of the box. They require that telemetry is enabled. SIMRIG Control Center configures most of these games for you and asks before doing so. A few games, like Project CARS 2, must be configured manually. See Supported Games for more information.
Firewall
Many games transmit telemetry over the local network. Network access is required to enable motion in these games.
Allow SIMRIG Control Center through the Windows Firewall if Windows asks:

Allow SIMRIG Control Center through the Windows Firewall.
You can also open the Settings Page and press Allow network access under Windows Firewall.
Common issues
By far the most common issue is an enabled emergency stop. This results in a hardware error. Simply twist the emergency stop to release it. Then restart the device by following the prompts in SIMRIG Control Center.