
Motion System
This section describes how to use the SIMRIG SR1, SR2, and SR3 motion systems with SIMRIG Control Center.
The motion system moves your rig while you drive. You feel braking, acceleration, cornering, and bumps through the whole rig. It moves along three axes: pitch, roll, and heave.
In SIMRIG Control Center the SR1, SR2, and SR3 are called Motion System.
Getting started
Connect the motion system to your PC and make sure it is powered
Twist the emergency stop to release it
Open the Devices page. The motion system shows up in the list of devices.
Enable motion by pressing the Enable button
Start a supported game and drive
See the full quick start guide for more details.
The motion system requires no calibration.
The motion system is enabled and disabled together with the belt tensioner. There is only one Enable button.
Profile settings
The motion system uses profiles. Each car, in each game, has its own profile. The settings in this section are located on the Motion System tab of the profile. The Belt Tensioner tab next to it is described in the belt tensioner section.
The Forces section above the tabs applies to both the motion system and the belt tensioner. It is normally handled by Auto-Tune.
Axis allocation
Each linear actuator has a fixed amount of travel. This is determined by the actuator’s mechanical construction. How we choose to use this travel is determined by the axis allocation settings.
A share of the travel is allocated for each motion axis (pitch, roll, heave.) For example, we can allocate 50 % of the travel to pitch, 30 % to roll, and 20 % to heave.
Interestingly, we could allocate 100 % of the travel to both pitch and roll at the same time for a total of 200 %. But! Moving twice the available travel is physically impossible. However, the vehicle will seldom brake at full power while also turning at full speed. If it does, the actuator will bottom out, causing the motion to clip. You can choose more motion at the risk of clipping; or less motion and no clipping. This is a compromise that is different for each vehicle.
There are two methods to choose from: Simplified and Individual.
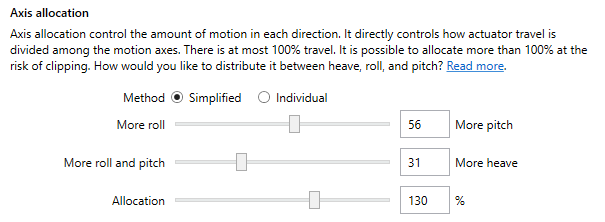
With the Simplified method the program adjusts the allocation of each axis to hit the desired total:
- More roll / More pitch:
Divides the travel between roll and pitch. 0 disables pitch. 100 disables roll. Recommended value: 50.
- More roll and pitch / More heave:
Divides the travel between heave and roll/pitch. 0 disables heave. 100 disables roll and pitch. Recommended value: 50.
- Allocation:
The total amount of travel to allocate. 100 % is full travel. A lower value leaves some travel unused, which suits a stiff sports car. A higher value allows more motion when two axes move at the same time, at the risk of clipping, which suits a rally car. Recommended value: 80-120 %.
With the Individual method you set the allocation of each axis yourself. Keep an eye on Allocated travel, which shows the total.
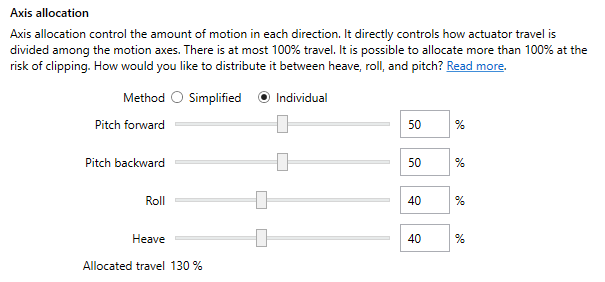
- Pitch forward:
Amount of travel allocated to forwards pitch (during braking.) Recommended value: 80 %.
- Pitch backward:
Amount of travel allocated to backwards pitch (during acceleration.) Recommended value: 50 %.
- Roll:
Amount of travel allocated to roll. Recommended value: 50 %.
- Heave:
Amount of travel allocated to heave. Recommended value: 20 %.
Intensity settings
Until this point we have considered settings that affect the range of motion. The intensity settings however affect its speed and acceleration. The speed and acceleration are crucial for the perceived intensity.
Intensity settings affect the linear actuators’ speed, acceleration, and travel. There are three presets to choose from: Normal, High, and Raw, with increasing levels of intensity. The fourth option, Custom, allows precise control of each setting.

- Stroke length:
Sets the actuator maximum travel. A value of 100 % allows the actuator to move 70 mm. The lowest value is 50 %, which allows for 35 mm of travel. Fast and stiff cars benefit from lower stroke length. Recommended value: around 80 % for GT3 cars and 100 % for rally cars.
- Responsiveness:
Sets the actuator power. A lower value results in lower acceleration while a higher value means more power and higher acceleration. Try a lower value if you think the motion system is too fast or too aggressive. The slider goes from 100 % to 200 %.
- Spring stiffness:
Sets the actuator compliance to directional changes. Try a lower value to remove high frequency noise and bumps.
Note
Responsiveness is limited to 150 % at first. You are strongly advised to use low responsiveness. Less is often better. Dismiss the message above the slider to unlock the full range.
Tip
Bind the Next preset hotkey to switch between presets without leaving the game. A voice tells you which preset was selected.
Gear shifts
Sequential and semi-automatic gear boxes introduce sudden and noticeable pitch motion. This motion can be uncomfortable or unwanted. Use these settings to smoothen the motion or remove it entirely.

- Enable:
When enabled, the algorithm will detect and remove, sudden changes in pitch caused by gear changes.
- Smoothing:
Some gearboxes are quicker and some are slower. The duration should cover the time it takes for the gearbox to change gear. Increase this slider until the pitch motion is to your liking (leave the feedback sliders at 0 % while tuning.) Recommended value: around 100 ms.
- Gear up feedback:
Increase to introduce haptic feedback when shifting up. Disabled in games that do not report gear shifts. This feedback is synthetic and meant to replace the motion generated in-game. Recommended value: 30-60 %.
- Gear down feedback:
Increase to introduce haptic feedback when shifting down.
- Gear up button, Gear down button:
Bind these hotkeys to the same buttons or paddles that shift gear in the game.
Some games report a gear change too late; the car has already lost its acceleration when SIMRIG Control Center is told about the new gear. With the two buttons bound, SIMRIG Control Center sees the gear change at the same time as the game. This greatly reduces the pitch motion on gear change. The difference is most noticeable in the F1 games.
Follow track geometry
Vehicle orientation is also an important source of motion data. Perhaps you would like the motion system to follow the road; to pitch backwards when going uphill or to roll more aggressively when hitting a curb. There are two settings which control how vehicle orientation affects the motion system:
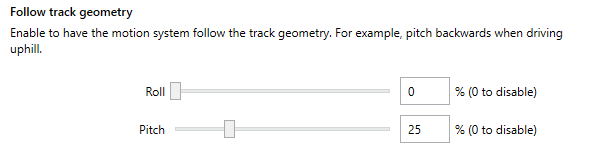
- Roll:
This slider controls how much of the vehicle roll that transfers over to the motion system. At around 20 % there is a one-to-one mapping between the virtual vehicle and the physical motion system (depending on distance between front and rear actuators.)
- Pitch:
This slider controls how much of the vehicle pitch that transfers over to the motion system. At around 20 % there is a one-to-one mapping between the virtual vehicle and the physical motion system (depending on distance between front and rear actuators.)
Set a slider to 0 % to disable it.
The sliders are disabled and the message Not supported by game is shown if the game does not report vehicle orientation.
Increase roll on oversteer
This setting causes the system to roll more when the car oversteers. It makes it easier to feel when the rear of the car steps out.
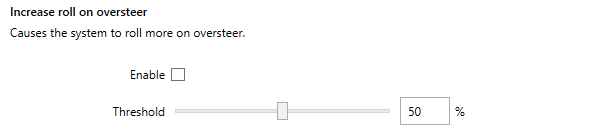
- Enable:
Enables the effect.
- Threshold:
The oversteer angle at which the system begins to roll. Increase to roll later in the oversteer. Reduce to roll sooner. Try to match the angle where the car loses its grip. Recommended value: 90 %.
The settings are disabled and the message Not supported by game is shown if the game does not report the required telemetry.
Effects
Effects add motion and vibrations for events that are not covered by acceleration alone. Set a slider to 0 to disable the effect.
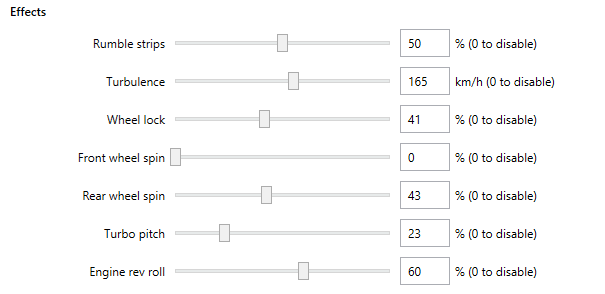
- Rumble strips:
Adds vibrations when driving over rumble strips. Recommended value: 50 %.
- Turbulence:
Adds roll to simulate turbulence affecting the car at high speeds. The slider sets the speed at which the effect begins. Recommended value: 220 km/h.
- Wheel lock:
Adds vibrations when locking the wheels while braking. Recommended value: 50 %.
- Front wheel spin:
Adds vibrations when the front wheels lose grip during understeer. Recommended value: 50 %.
- Rear wheel spin:
Adds vibrations when the rear wheels lose grip during oversteer and burnouts. Recommended value: 50 %.
- Turbo pitch:
Adds pitch when the turbo kicks in. Do not use together with Pitch washout. Recommended value: 50 %.
- Engine rev roll:
Adds roll when revving the engine on the start line. Only applies while standing still. Recommended value: 50 %.
Note
All effects are not available in all games. An effect that the game does not support is disabled.
Post processing
Sometimes it is necessary to apply post-processing techniques to the telemetry data; such as smoothing and velocity limiters.
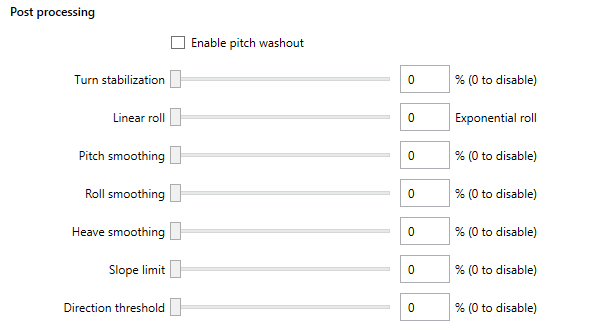
- Enable pitch washout:
When enabled, pitch washout returns the system to a natural pitch during constant acceleration. This makes the motion system level with your floor during extended acceleration. Furthermore, the pitch velocity is limited for a smoother ride. Braking is not affected.
- Turn stabilization:
Turn stabilization adds a dead-zone on the roll axis. This makes the motion system less prone to rolling when driving straight. You will still experience roll motion when turning. Increasing this value makes the dead-zone larger and the motion system more stable. Recommended value: 10 %.
- Linear roll / Exponential roll:
Reduces roll while turning slowly and increases roll in more aggressive turns. 0 is a linear roll response. 100 is an exponential roll response. Recommended value: 0.
- Pitch smoothing, Roll smoothing, Heave smoothing:
These sliders control the speed at which the system reacts to changes on each axis. Setting a slider to 0 % disables smoothing on that axis, making the system as fast and responsive as possible. Increasing the value will reduce (and even remove) fast and twitchy motion. A large value will result in a smooth ride.
- Slope limit:
Limits how fast the position is allowed to change on all axes. 0 % is no limit. 100 % is no motion. Start at 45 % and increase to make the motion slower.
- Direction threshold:
Increase to ignore small changes in direction. Applies to each axis separately. 0 % allows all direction changes. 100 % only allows large direction changes.
Tip
Some games work better with smoothing enabled. If the motion is twitchy or choppy, try setting the smoothing sliders to 100 % and reduce gradually until you get a smooth and responsive ride.
Pause the motion system
Bind the Pause motion system hotkey to turn the motion system on and off while the belt tensioner keeps running. The Pause belt tensioner hotkey does the opposite.
The Motion status at the bottom of the window shows what is paused.
Tools and settings
The following tools and settings are located on the Devices page. Select the motion system in the list of devices to show them.
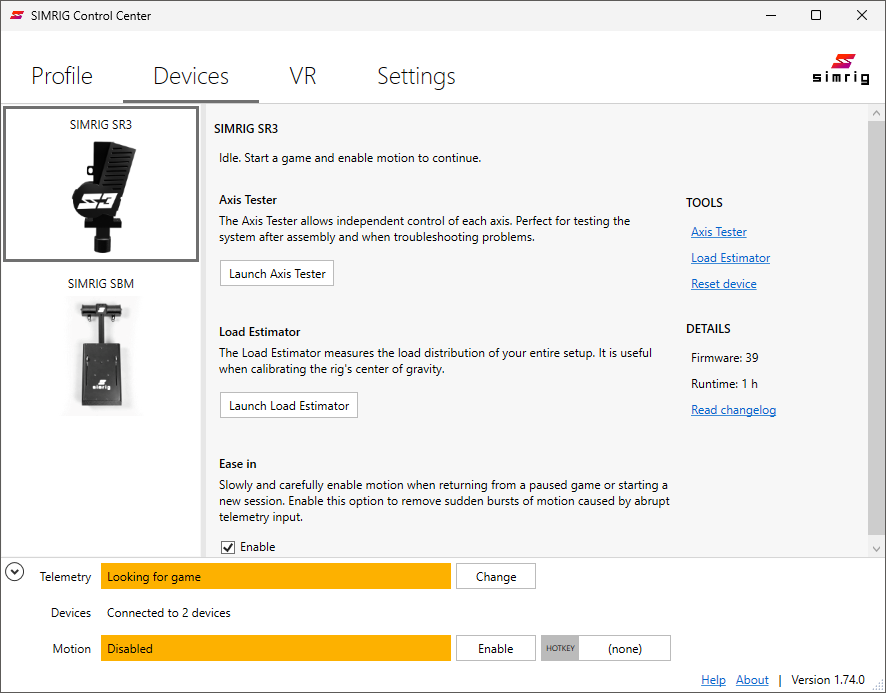
- Axis Tester:
Moves the motion system by hand, one axis at a time. See Axis Tester.
- Load Estimator:
Measures how the load is divided between the front and the rear actuators. See Load Estimator.
- High frequency control:
The actuators produce an audible noise at their control frequency. Use this option to toggle between a higher and a lower frequency. The higher frequency is inaudible for most and annoying for some. Only shown for SIMRIG SR1 and SIMRIG SR2 with older firmware.
- Keep level:
Keeps the actuators in a neutral position while motion is enabled and no telemetry is received. This keeps the rig level before and after races. The actuators power down after 30 minutes of inactivity. Only shown for SIMRIG SR1.
- Ease in:
Slowly and carefully enables motion when returning from a paused game or starting a new session. Enable this option to remove sudden bursts of motion caused by abrupt telemetry input.
- Reset device:
Restarts the motion system. This clears any hardware error and makes the motion system recalibrate. Listed under Tools on the right.
Emergency stop
The message Emergency stop active is shown on the Devices page when the emergency stop has been activated. The actuators cannot move until it is released.
Investigate why the emergency stop was activated. Then twist the emergency stop to release it and press Reset device. The motion system will recalibrate.
See hardware errors for other errors.
Degraded performance due to heat
The message Degraded performance due to heat is shown on the Devices page when the motion system is operating with reduced performance because of heat. This may be caused by a warm room, high load, or a cooling fan that is not working.
The cooling fan in the control unit only runs while the system is active. Use the Axis Tester to check that it spins. Make sure nothing is blocking the airflow or the fan blades.